copy from user/pass@source to user/pass@dest create table_name using select * from table_name
this sqlplus command create a table in destination database and insert all tables data from source database
more infos
Thursday, May 31, 2012
Shell script to move oracle datafile
# We set the SID of the oracle database
export ORACLE_SID=BICEC
# We define the log filename
logfile=mv_datafiles_test_iris.log
# shutdown the database before moving the files
echo "Shutting down the database ==> `date`" >> $logile
sqlplus "/ as sysdba" <<fin
shutdown immediate
fin
echo "Base arretee... `date`" >> $logfile
# Now we can move the files on OS level
echo "Moving datafiles..." >> $logfile
mv old_1 new_1
mv old_2 new_2
...
...
mv old_n new_n
# echo "We mount the database and rename the files on database level `date`" >> $logfile
sqlplus "/ as sysdba" <<eof
STARTUP MOUNT
ALTER DATABASE RENAME FILE 'old_1' TO 'new_1';
ALTER DATABASE RENAME FILE 'old_2' TO 'new_2';
...
...
ALTER DATABASE RENAME FILE 'old_n' TO 'new_n';
ALTER DATABASE OPEN;
eof
echo "fertig... `date`" >> $logfile
Steps to move Oracle datafiles to another file system
- Take the tablespace offline
select TABLESPACE_NAME from dba_data_files where FILE_NAME = 'file_name';
To take a tablespace offline
alter tablespace tablespace_name offline
- Physicaly move the datafiles at OS level
- Rename the datafiles at database level
- Bring the tablespace back online
Wednesday, May 30, 2012
ORA 29807 during Oracle database creation with DBCA
I am trying to create a database in oracle 9i with dbca utility, during the creation of data dictionary views, oracle returns an error ORA-29807 "specified operator does not exist"
The Oracle oerr utility give this info about this error
$ oerr ORA 29807
"specified operator does not exist"
// *Cause: The operator which has been specified does not exist.
// *Action: Ensure that the operator that has been specified does exist.
according to the documentation about ORA-29807, "A patchset has been installed on the Oracle Server 9.2.0.1 base release".
This document also states that you may simply ignore ORA-29807 as a fix.
Tuesday, May 29, 2012
How to efficiently allocate your Oracle database resources
What is the limit on the amount of resources a user can use?
What if a user unwittingly starts a SQL program that guzzles resources like crazy and
brings your system to its knees?
How can ensure that the databases
is not loaded down by inefficient queries.
Can you limit an individual's usage of resources, so you can
allocate resources on a need-to-use basis?
You can set the individual resource
limits in Oracle by using what are known as profiles.
You
can use profiles to set hard limits on resource consumption by the various users
in the database. Profiles help you limit the number of sessions a user can
simultaneously keep open, the length of time these sessions can be maintained,
and the usage of CPU and other resources.
Here, for example, is a profile called
"reporting"
SQL> create profile reporting
  2  limit
  3  connect_time 120
  4  failed_login_attempts 2
  5  idle_time 60
  6* sessions_per_user 2;
Profile created.
SQL>
The reporting profile when granted to a user will permit that
user to be connected for a maximum of 120 seconds and will log out the user if
he or she is idle for more than 1 minute. The user is limited to two sessions at
any one time. If the user fails to log in within two attempts, the user's
accounts will be "locked" for a specified period or until the DBA manually
unlocks them.
Oracle9i enables you to set limits on several parameters
within a profile. The following sections provide brief explanations of these
parameters. You can divide the profile parameters into two broad types: resource parameters, which are concerned purely with limiting
resource usage, and password parameters, which are used
for enforcing password-related security policies.
Resource parameters are profile parameters that you can set to control resource
usage by users. The main purpose in using resource parameters is to ensure that
a single user or a set of users doesn't monopolize the database and server
resources. Here are the most important resource parameters that you can set
within an Oracle9i database:
-
Connect_time: The total time a session may remain connected to the database.
-
Cpu_per_call: Limits the CPU used per each call within a transaction (for the parse, execute, and fetch operations).
-
Cpu_per_session: Limits the total CPU used during a session.
-
Sessions_per_user: Maximum number of concurrent sessions that can be opened by the user.
-
Idle_time: Limits the amount of time a session is idle (i.e., nothing is running on its behalf).
-
Logical_reads_per_session: Total number of data blocks read (memory plus disk reads).
-
Logical_reads_per_call: Limits the logical reads per each session call (parse, execute, and fetch).
-
Private_sga: This is a limit applicable only to shared server architecture-based systems. It specifies a session's limits on the space it allocated in the shared pool component of the SGA.
-
Composite_limit: A composite limit is a sum of several of the previously described resource parameters, measured in service units. These resources are weighted by their importance. Oracle takes into account four parameters to compute a weighted composite_limit: cpu_per_session, connect_time, logical_reads_per_session, and private_sga. You can set a weight for each of these four parameters by using the alter resource cost statement, as shown in the following example:
SQL> alter resource cost
  2  cpu_per_session 200
  3  connect_time 2;
Resource cost altered.
SQL>
When Do Profile Changes Go into Effect?
After you create a profile, when does
it come into force? That is, when will the user be really restricted to four
simultaneous sessions? The surprising answer is . . . never! Unless you have an initialization parameter modified
from its default value, the profile changes you make will never come into force.
The initialization parameter is the resource_limit
parameter, and its default value is false. You need to set
it to true, either by restarting the database after an
init.ora file change or through the use of the alter
system command, as shown here:
SQL> alter system set resource_limit=true;
System altered.
SQL>
Make sure you have the resource_limit
parameter set to true in order for the resource limits set
by the profiles to be enforced. Otherwise, Oracle will ignore the limits set in
the create or alter profile
statement
|
Assign a profile
You assign a profile to a user by using the alter user
statement, as follows
SQL> alter user gm_fomi
  2  profile test;
User altered.
SQL>
Using the Database Resource Manager
The Database Resource Manager allows you to create resource plans, which specify
how much of your resources should go to the various consumer groups. You can now
group users based on their resource requirements, and you can have the Database
Resource Manager allocate a preset amount of resources to these groups. Thus,
you can easily prioritize among your users and jobs.
The resource plans that you formulate have the directives
regarding resource usage, and you can easily modify these plans. Using the
Database Resource Manager, it's possible for you to ensure that your critical
user groups (called consumer groups here) are always
guaranteed enough resources to perform their tasks. The resources that the
Database Resource Manager can allocate are CPU usage, degree of parallelism,
execution time limit, and the undo that can be generated by a consumer group.
You can also limit the maximum number of concurrently active sessions allowed in
each group.
Here's the sequence of actions you need to take to start using the
Database Resource Manager:
Create a pending area
Before you can modify an old plan or create a new plan, you
need to activate or create a pending area using the Database Resource Manager
package in the following manner. All the resource plans you'll create will be
stored in the data dictionary, and the following create pending area procedure
will enable you to work with resource plans in a staging area before they are
implemented:
SQL> execute dbms_resource_manager.create_pending_area;
PL/SQL procedure successfully completed.
SQL>
You can also clear the pending area anytime you want by using the
following procedure:
SQL> execute dbms_resource_manager.clear_pending_area;
PL/SQL procedure successfully completed.
SQL>
Creating Consumer Groups
Once the pending area is active, you can create the consumer
groups to which you'll allocate your users. You can assign users initially to
one group, and you can later switch them to other groups if necessary. Now
you'll create in your database three consumer groups : agency, direction, and
national.
SQL> execute dbms_resource_manager.create_consumer_group
(consumer_group => 'agency',comment => 'remote agencies');
PL/SQL procedure successfully completed.
SQL> execute dbms_resource_manager.create_consumer_group
(consumer_group => 'direction',-> comment => 'direction');
PL/SQL procedure successfully completed.
SQL> execute dbms_resource_manager. create_consumer_group
(consumer_group => 'national',-> comment => 'national office');
PL/SQL procedure successfully completed.
SQL>
Assigning Users to Consumer Groups
Users are already members of a default group, the default_consumer_group. Therefore, you need to first grant
the three users privileges to switch their groups before you can actually switch
them to your new groups. If you just grant the user PUBLIC the privilege to
switch groups, you don't have to grant the privilege individually to all the
users in the group. If you have a large number of users in each group, it is
better to grant the user PUBLIC the privilege to switch groups, so you can avoid
granting the privilege individually to each user.
SQL> execute dbms_resource_manager_privs.grant_switch_consumer_group('gm_fomi','low_group',TRUE);
PL/SQL procedure successfully completed.
SQL> execute dbms_resource_manager.set_initial_consumer_group ('gm_fomi','low_group');
PL/SQL procedure successfully completed.
Verifying Consumer Group Membership of Users
SQL> select username,initial_rsrc_consumer_group from dba_users;
USERNAME INITIAL_RSRC_CONSUMER_GROUP
------------------ -------------------------------------------------------
SYS SYS_GROUP
SYSTEM SYS_GROUP
DBSNMP DEFAULT_CONSUMER_GROUP
SIGNAT DEFAULT_CONSUMER_GROUP
PERFSTAT DEFAULT_CONSUMER_GROUP
OUTLN DEFAULT_CONSUMER_GROUP
WMSYS DEFAULT_CONSUMER_GROUP
GM_FOMI LOW_GROUP
Creating Resource Plans and Plan Directives
The heart of the Database Resource Manager is its capability to assign resource
plans to various groups.
Resource plans enable you to set limits on resource use by
specifying limits on four variables: CPU, active session pool, degree of
parallelism, and the order in which queued sessions will execute. Currently, for
all four parameters, only the default levels and methods provided by Oracle can
be used.
Creating Resource Plans
Create your resource plan by invoking the DBMS_RESOURCE_MANAGER package :
SQL> execute dbms_resource_manager.create_pending_area;
PL/SQL procedure successfully completed.
SQL>  execute dbms_resource_Manager.create_plan (plan => 'membership_plan',comment => 'New Membership Recruitment');
PL/SQL procedure successfully completed.
Creating a Plan Directive
You now have a resource plan, but the plan still doesn't
have any resource limits assigned to it. You need to create a resource plan directive to assign specific resource limits to
your resource plan.
SQL> execute dbms_resource_manager.create_plan_directive
(plan => 'test_plan',GROUP_OR_SUBPLAN => 'low_group',
COMMENT => 'test_plan_directive',CPU_P1 => 70);
PL/SQL procedure successfully completed.
SQL> execute dbms_resource_manager.create_plan_directive
(plan => 'test_plan',GROUP_OR_SUBPLAN => 'test_group',
COMMENT => 'test_plan_directive',CPU_P1 => 30);
PL/SQL procedure successfully completed.
This plan directive assigns 70 percent of the available CPU at the first level to the low_group and the rest, 30 percent, to the test_group
In addition to the preceding groups, you'll need to add a
plan directive for the default other_groups for the
Database Resource Manager to accept your plan directives.
SQL> execute dbms_resource_manager.create_plan_directive (plan => 'test_plan',GROUP_OR_SUBPLAN  => 'OTHER_GROUPS', comment => '',cpu_p1 => 0);
PL/SQL procedure successfully completed.
SQL>
| Tip |
If you don't include a resource directive for other_groups, Oracle won't let you use your directives for
the other groups if the plan directive is for a primary or top
plan.
|
You can now validate and submit your new top-level plan, membership_plan, in the following manner:
SQL>  execute dbms_resource_manager.validate_pending_area;
PL/SQL procedure successfully completed.
SQL> execute dbms_resource_manager.submit_pending_area;
PL/SQL procedure successfully completed.
Determining the Status of the Resource Plans
SQL> select plan,group_or_subplan,cpu_p1,cpu_p2,cpu_p3, status from dba_rsrc_plan_directives;
PLAN                      GROUP_OR_SUBPLA     CPU_P1     CPU_P2     CPU_P3 STATUS
------------------------- --------------- ---------- ---------- ---------- ----------
SYSTEM_PLAN               SYS_GROUP              100          0          0 PENDING
SYSTEM_PLAN               OTHER_GROUPS             0        100          0 PENDING
SYSTEM_PLAN               LOW_GROUP                0          0        100 PENDING
INTERNAL_QUIESCE          SYS_GROUP                0          0          0 PENDING
INTERNAL_QUIESCE          OTHER_GROUPS             0          0          0 PENDING
INTERNAL_PLAN             OTHER_GROUPS             0          0          0 PENDING
SYSTEM_PLAN               SYS_GROUP              100          0          0 ACTIVE
SYSTEM_PLAN               OTHER_GROUPS             0        100          0 ACTIVE
SYSTEM_PLAN               LOW_GROUP                0          0        100 ACTIVE
INTERNAL_QUIESCE          SYS_GROUP                0          0          0 ACTIVE
INTERNAL_QUIESCE          OTHER_GROUPS             0          0          0 ACTIVE
INTERNAL_PLAN             OTHER_GROUPS             0          0          0 ACTIVE
Enabling the Database Resource Manager
The fact that you created a new plan and plan directives and
submitted your pending area doesn't mean that Oracle will automatically enforce
the resource plans. It's our job to explicitly activate the Database Resource
Manager, either by specifying the initialization parameter resource_manager_plan in the init.ora file or by using the alter system command in the following manner:
SQL> alter system set resource_manager_plan=MEMBERSHIP_PLAN ;
System altered.
SQL> select * from v$rsrc_plan;
NAME
--------------------------------
MEMBERSHIP_PLAN
SQL>
If you decide to deactivate the Database Resource Manager, you use
the following command:
SQL> alter system set resource_manager_plan='';
System altered.
SQL>  select * from v$rsrc_plan;
no rows selected
Saturday, May 26, 2012
oracle resource management scripts
Create resource manager plan
begin

  begin
     dbms_resource_manager.create_simple_plan
        (simple_plan => 'MY_PLAN'
        ,consumer_group1 => 'USERS', group1_cpu => 90
        ,consumer_group2 => 'ADMIN', group2_cpu => 10 );
     exception when others then
      null;
  end;

end;
/
List the configuration of the Database Resource Manager
set linesize 1000
col plan form a40 heading "Plan Name"
col group_or_subplan form a15 heading "Sub-Plan"
col status form a6 heading "Status"
col cpu_p1 form 999 heading "CPU1"
col cpu_p2 form 999 heading "CPU2"
col cpu_p3 form 999 heading "CPU3"
col cpu_p4 form 999 heading "CPU4"

PROMPT
PROMPT Plans on database

select plan, cpu_method, status from dba_rsrc_plans;

PROMPT
PROMPT Resource Plan Directives

select plan, group_or_subplan, type, cpu_p1, cpu_p2, cpu_p3, cpu_p4, status
  from dba_rsrc_plan_directives
order by 8,1,2,3,4,5,6;

PROMPT
PROMPT Consumer Group Privileges

select * from dba_rsrc_consumer_group_privs;

PROMPT
PROMPT Default User Consumer Groups

select username, initial_rsrc_consumer_group from dba_users;
assign a resource manager plan to users
Parameters
&1 - The resource consumer group&2 - The user to be assigned the consumer group
set verify off

define consumer_group = UPPER('&1')
define user = UPPER('&2')

begin

dbms_resource_manager_privs.grant_switch_consumer_group
      ( grantee_name => &user
      , consumer_group => &consumer_group
      , grant_option => FALSE);

dbms_resource_manager.set_initial_consumer_group
     (user => &user
     ,consumer_group  => &consumer_group );

end;
/

exit
Monitor Database Resource Manager Sessions
col sid form 999 heading "SID"
col serial# form 99999 heading "Serial"
col program form a28 heading "Program"
col username form a12 heading "Username"
col resource_consumer_group form a22 heading "Consumer Group"
col name form a12 heading "Name"
col active_sessions form 99999 head "Active"
col consumed_cpu_time form 99999999 heading "Con CPU"
col sessions_queued form 99999 heading "Queued"

spool monrsrc.lst

select sid,serial#,username,program,resource_consumer_group
from v$session
/

select name,active_sessions,consumed_cpu_time
       ,requests,cpu_wait_time,cpu_waits, sessions_queued
from v$rsrc_consumer_group
/

spool off
Drop a resource manager plan and any associated subplans
Parameters
&1 - The Plan Name to dropset serveroutput on
col plan form a12 heading "Plan Name"
select plan, cpu_method, status from dba_rsrc_plans;
ACCEPT plan_name PROMPT 'Enter value for Plan to Drop : '
spool drop_rsrc.lst
DECLARE
l_plan_name DBA_RSRC_PLANS.plan%TYPE := UPPER('&plan_name') ;
BEGIN
dbms_output.put ('Creating Pending Area...');
dbms_resource_manager.create_pending_area();
dbms_output.put_line ('Pending Area Created.');
dbms_output.put ('Deleting Plan '||l_plan_name||'...');
dbms_resource_manager.delete_plan( plan => l_plan_name);
dbms_output.put_line ('Plan Deleted.');
FOR con_grp IN ( SELECT group_or_subplan
FROM dba_rsrc_plan_directives
WHERE plan = l_plan_name
) LOOP
dbms_output.put ('Deleting Consumer Group '
||con_grp.group_or_subplan||'...');
dbms_resource_manager.delete_consumer_group(
consumer_group => con_grp.group_or_subplan );
dbms_output.put_line ('Consumer Group Deleted.');
END LOOP;
dbms_output.put ('Submitting Pending Area ...');
dbms_resource_manager.submit_pending_area();
dbms_output.put_line ('Pending Area Submitted.');
EXCEPTION WHEN others THEN
dbms_output.new_line ;
dbms_output.put_line ('Error Occurred :'||SQLERRM);
dbms_resource_manager.clear_pending_area();
dbms_output.put_line ('... Pending Area Cleared.');
END;
/
spool off
Lists usage information of consumer groups
SELECT name,consumed_cpu_time
FROM   v$rsrc_consumer_group
ORDER BY name;
Lists all resource plans
SET LINESIZE 200
SET VERIFY OFF

COLUMN status FORMAT A10
COLUMN comments FORMAT A50

SELECT plan,
       status,
       comments
FROM   dba_rsrc_plans
ORDER BY plan;
Lists all consumer groups
SET LINESIZE 200
SET VERIFY OFF

COLUMN status FORMAT A10
COLUMN comments FORMAT A50

SELECT consumer_group,
       status,
       comments
FROM   dba_rsrc_consumer_groups
ORDER BY consumer_group;
Disable redo log generation generation before bulk load of data
Redo logs are there for recovering your database in the event of a crash or an OS
file corruption. If you don't have redo logging on, then if anything
goes wrong with the database your users will lose all their work since
the last good back up.Not logging in a transactional
system is a very bad idea.
But in some circumstances you can disable redo log generation without worries and improves performance
But in some circumstances you can disable redo log generation without worries and improves performance
- In test environment
- bulk load of data
- creating/recreating of indexes
How to avoid the checkpoint not complete error in Oracle 9i
if you frequently load large amounts of data in an Oracle database, then it is very likely that you get the message checkpoint not complete in the alert log file oracle.
The "checkpoint not complete" messages are generated because the logs are switching so fast that the checkpoint associated with the log switch isn’t complete.
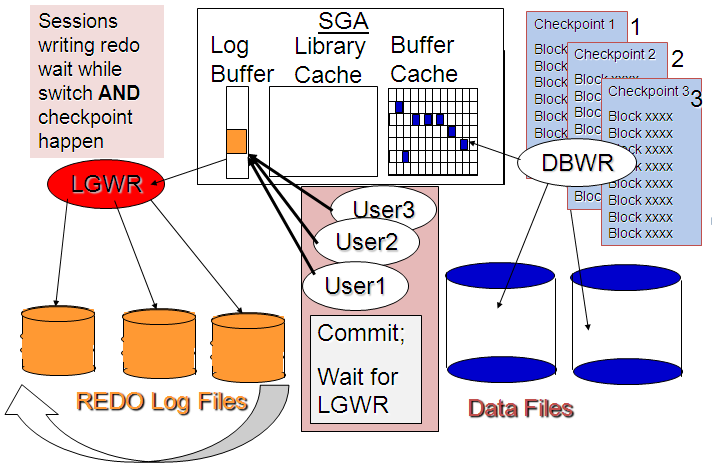
The "checkpoint not complete" messages are generated because the logs are switching so fast that the checkpoint associated with the log switch isn’t complete.
Oracle suggests that you
might consider setting archive_lag_target to zero to reduce
"checkpoint not complete" messages:
alter system set archive_lag_target=0 scope=both;
Overall Oracle performance
can be dramatically improved by increasing the log sizes so that
logs switch at the recommended interval of 15 to 30 minutes.
Identify the current size
of the redo log members from v$log, record the number of
log switches per hour and increase the size of the log to allow
Oracle to switch at the recommended rate of one switch per 15 to 30
minutes.
For example, if the database redo log size is 1
megabyte and you are switching logs every 1 minute, you will need to
increase the log size to 30 megabytes in size to allow it to switch
every 30 minutes.
You need to ensure that the on-line redo logs
don’t switch too often during periods of high activity and switch
often enough during times of low processing workloads.
This should reduce the delays from the checkpoint
not complete errors.
Oracle Shared pool layers
The shared pool caches various types of program data. For example, the shared pool stores parsed SQL, PL/SQL code, system parameters, and data dictionary
information. The shared pool is involved in almost every operation that
occurs in the database. For example, if a user executes a SQL
statement, then Oracle Database accesses the shared pool.

When a SQL statement is executed, the database attempts to reuse previously executed code. If a parsed representation of a SQL statement exists in the library cache and can be shared, then the database reuses the code, known as a soft parse or a library cache hit. Otherwise, the database must build a new executable version of the application code, known as a hard parse or a library cache miss.

The data dictionary is accessed so often by Oracle Database that the following special memory locations are designated to hold dictionary data:
A client result cache differs from the server result cache. A client cache is configured at the application level and is located in client memory, not in database memory.
Allocation of memory from the shared pool is performed in chunks. Chunking allows large objects (over 5 KB) to be loaded into the cache without requiring a single contiguous area. In this way, the database reduces the possibility of running out of contiguous memory because of fragmentation.
Infrequently, Java, PL/SQL, or SQL cursors may make allocations out of the shared pool that are larger than 5 KB. To allow these allocations to occur most efficiently, the database segregates a small amount of the shared pool for the reserved pool.
Library Cache
The library cache is a shared pool memory structure that stores executable SQL and PL/SQL code. This cache contains the shared SQL and PL/SQL areas and control structures such as locks and library cache handles. In a shared server architecture, the library cache also contains private SQL areas.When a SQL statement is executed, the database attempts to reuse previously executed code. If a parsed representation of a SQL statement exists in the library cache and can be shared, then the database reuses the code, known as a soft parse or a library cache hit. Otherwise, the database must build a new executable version of the application code, known as a hard parse or a library cache miss.
Data Dictionary Cache
The data dictionary is a collection of database tables and views containing reference information about the database, its structures, and its users. Oracle Database accesses the data dictionary frequently during SQL statement parsing.The data dictionary is accessed so often by Oracle Database that the following special memory locations are designated to hold dictionary data:
-
Data dictionary cache
This cache holds information about database objects. The cache is also known as the row cache because it holds data as rows instead of buffers.
-
Library cache
Server Result Cache
Unlike the buffer pools, the server result cache holds result sets and not data blocks. The server result cache contains the SQL query result cache and PL/SQL function result cache, which share the same infrastructure.A client result cache differs from the server result cache. A client cache is configured at the application level and is located in client memory, not in database memory.
Reserved Pool
The reserved pool is a memory area in the shared pool that Oracle Database can use to allocate large contiguous chunks of memory.Allocation of memory from the shared pool is performed in chunks. Chunking allows large objects (over 5 KB) to be loaded into the cache without requiring a single contiguous area. In this way, the database reduces the possibility of running out of contiguous memory because of fragmentation.
Infrequently, Java, PL/SQL, or SQL cursors may make allocations out of the shared pool that are larger than 5 KB. To allow these allocations to occur most efficiently, the database segregates a small amount of the shared pool for the reserved pool.
Minimise redo log generation during import in Oracle 9i
- Use direct path
- Import without the indexes (use indexes=NO)
- Create the index script file (with indexfile=indexscript.sql)
- Modify the index script file to add NOLOGGING to the CREATE INDEX statements
- Run the index script file
Saturday, May 19, 2012
Script to resize Oracle Datafiles
Over-allocation of space at the file level affects the backup/recovery window, file checking times and, most painfully, limits the potential allocation of space to a tablespace that needs the extra room. A simpler solution would be to review the evolution of the script, which lets you know which files can and cannot be resized to create more space.
It's possible to release space from data files but only down to the first block of data. This is done with the 'alter database' command.
The following script allows to calculate the amount of space used by each tablespace
SELECT tablespace_name, SUM (bytes) bytes_full
FROM dba_extents
GROUP BY tablespace_name;
The following scripts allows to calculate the total space available for each tablespace
SELECT tablespace_name, SUM (bytes) bytes_total
FROM dba_data_files
GROUP BY tablespace_name;
The following script allows to find the last data block that has been inserted for each file
SELECT tablespace_name, file_id, MAX (block_id) max_data_block_id
FROM dba_extents
GROUP BY tablespace_name, file_id;
The following allows to find the free space in each file above the last data block inserted
SELECT a.tablespace_name, a.file_id, b.bytes bytes_free
FROM ( SELECT tablespace_name, file_id, MAX (block_id) max_data_block_id
FROM dba_extents
GROUP BY tablespace_name, file_id) a, dba_free_space b
WHERE a.tablespace_name = b.tablespace_name
AND a.file_id = b.file_id
AND b.block_id > a.max_data_block_id;
Finally the following will allow to generate alter statements to resize your datafiles
SELECT 'alter database '
|| a.name
|| ' datafile '''
|| b.file_name
|| ''''
|| ' resize '
|| GREATEST (TRUNC (bytes_full / .7), (bytes_total - bytes_free))
FROM v$database a,
dba_data_files b,
( SELECT tablespace_name, SUM (bytes) bytes_full
FROM dba_extents
GROUP BY tablespace_name) c,
( SELECT tablespace_name, SUM (bytes) bytes_total
FROM dba_data_files
GROUP BY tablespace_name) d,
(SELECT a.tablespace_name, a.file_id, b.bytes bytes_free
FROM ( SELECT tablespace_name,
file_id,
MAX (block_id) max_data_block_id
FROM dba_extents
GROUP BY tablespace_name, file_id) a,
dba_free_space b
WHERE a.tablespace_name = b.tablespace_name
AND a.file_id = b.file_id
AND b.block_id > a.max_data_block_id) e
WHERE b.tablespace_name = c.tablespace_name
AND b.tablespace_name = d.tablespace_name
AND bytes_full / bytes_total < .7
AND b.tablespace_name = e.tablespace_name
AND b.file_id = e.file_id;
Setting up Autotrace in SQL*Plus
AUTOTRACE is a facility within SQL*Plus to show us the explain plan of the queries we've executed, and
the resources they used. There is more than one way to get AUTOTRACE configured.
This is how i do to get AUTOTRACE working:
• cd $ORACLE_HOME/rdbms/admin (or cd %ORACLE_HOME%/rdbms/admin on Windows)
• log into SQL*Plus as SYSTEM ==> sqlplus system/pass@alias
• run @utlxplan
• run CREATE PUBLIC SYNONYM PLAN_TABLE FOR PLAN_TABLE;
• run GRANT ALL ON PLAN_TABLE TO PUBLIC;
You can replace the GRANT TO PUBLIC with some user if you want. By making it public, you let
anyone trace using SQL*Plus. This prevents every user from having to install their own plan table. The alternative is for you to run @utlxplan in every schema from which you
want to use AUTOTRACE.
The next step is creating and granting the PLUSTRACE role:
• cd $ORACLE_HOME/sqlplus/admin (or cd %ORACLE_HOME%/sqlplus/admin on Windows)
• log into SQL*Plus as SYS or AS SYSDBA
• run @plustrce
• run GRANT PLUSTRACE TO PUBLIC;
Again, you can replace PUBLIC in the GRANT command with some user if you want.
Wednesday, May 16, 2012
This is how i customize my sqlplus prompt
I often use sqlplus to perform my daily
administrative tasks and i work on multiple servers that contain
multiple databases, each database contains multiple accounts.
When connected to a database, i need to know my username and my database connection to reassure me that I point to the correct database in order to avoid errors that could be catastrophic.
To customize your sqlplus prompt
- Navigate to the directory $ORACLE_HOME/sqlplus/admin
- Create a file login.sql (or edit the file if it already exists) using vi on unix / Linux or notepad on windows
- SET SQLPROMPT '&_USER.@&_CONNECT_IDENTIFIER.> '
The next time you will login your sqlplus prompt will look like this : user@alias
Here is a complete list of SQL*Plus variables that you can use to customize your prompt.
There are eight variables defined during SQL*Plus installation. These
variables only differ from user defined variables by having predefined
values.Tuesday, May 15, 2012
Establish a direct connection to Oracle from sqlplus (without an alias)
People like us who change environments all the time with various customers, not to waste time configuring a connection alias in the tnsnames.ora file you can directly connect to an ORACLE database from sqlplus using
sqlplus user/pass@server_ip:port/sid
ex: sqlplus guy/fomi@10.10.10.10:1521/test
sqlplus user/pass@server_ip:port/sid
ex: sqlplus guy/fomi@10.10.10.10:1521/test
How to fix ORA-00214
One of our test servers has terminated abnormally in the night.
After restarting the server, oracle sends us this error message during the startup of one of our bases :
ORA-00214: controlfile '/u02/oradata/control01.ctl' version 498359
inconsistent with file '/u02/oradata/control03.ctl' version 498341
The solution consists in opening the database with a single good copy
of the control file and then shutting the database down and copying
that version of the control file onto the other mirrored copies.
That will cause the next startup to succeed. The steps to be followed
are:
1. If the database is still up, do a shutdown abort now.
2. Edit the init.ora file for this instance (or config.ora in an ifile
configuration).
Find the CONTROL_FILES parameter and modify it to include
just ONE copy of the control file that you have reasons to
believe is up-to-date. For example, if you only have two
mirrored copies X and Y of the control file:
CONTROL_FILES = (X, Y)
and you know you have accidentally overwritten X with an old
copy, make
CONTROL_FILES = (Y)
If you are not sure about it, choose any one of the control file
copies and remove or comment out all the other copies from the
CONTROL_FILES parameter.
3. Start up the database in restricted mode.
STARTUP RESTRICT
If the database comes up fine, move on to Step 4.
If instead you get ORA-1122, ORA-1110, and ORA-1207, go back to
Step 2 and make the CONTROL_FILES parameter point to another one
of the mirrored copies. If you have already tried each and
every one of the mirrored copies unsuccessfully, you must create
a new control file for the database. See the Solution Reference
to PR entry 1012929.6 ("How to Recreate the Control File").
If you get ORA-1113 and ORA-1110 pointing to one of the datafiles,
it means the copy of the control file you picked is good, but
the referenced datafile must be recovered before the database can be
opened. Try issuing a RECOVER DATABASE command and applying the
logs you are prompted for. You may have to resort to the online
logs to complete media recovery. For further details, see the
Solution Reference to PR entry 1012943.6 on ORA-1113. Once the
datafile is recovered, issue an ALTER DATABASE OPEN.
4. Shut the database down (normal or immediate).
5. Make all copies of the control file consistent.
Copy the good mirrored copy of the control file that you just used
to bring the database up onto all other copies, as originally listed
in the CONTROL_FILES parameter of your init.ora file (or config.ora
in an ifile configuration).
6. Restore the CONTROL_FILES parameter to its original value.
Edit the init.ora file for this instance (or config.ora in an ifile
configuration) to make the CONTROL_FILES parameter include
all mirrored copies of the control file again.
7. Start up the database.
Source : Metalink note 1014751.6
Monday, May 14, 2012
SQLPLUS SET System Variable Summary
I need to lookup these variables very often for my sqlplus scripts
Subscribe to:
Posts (Atom)